 Save to feedthepins
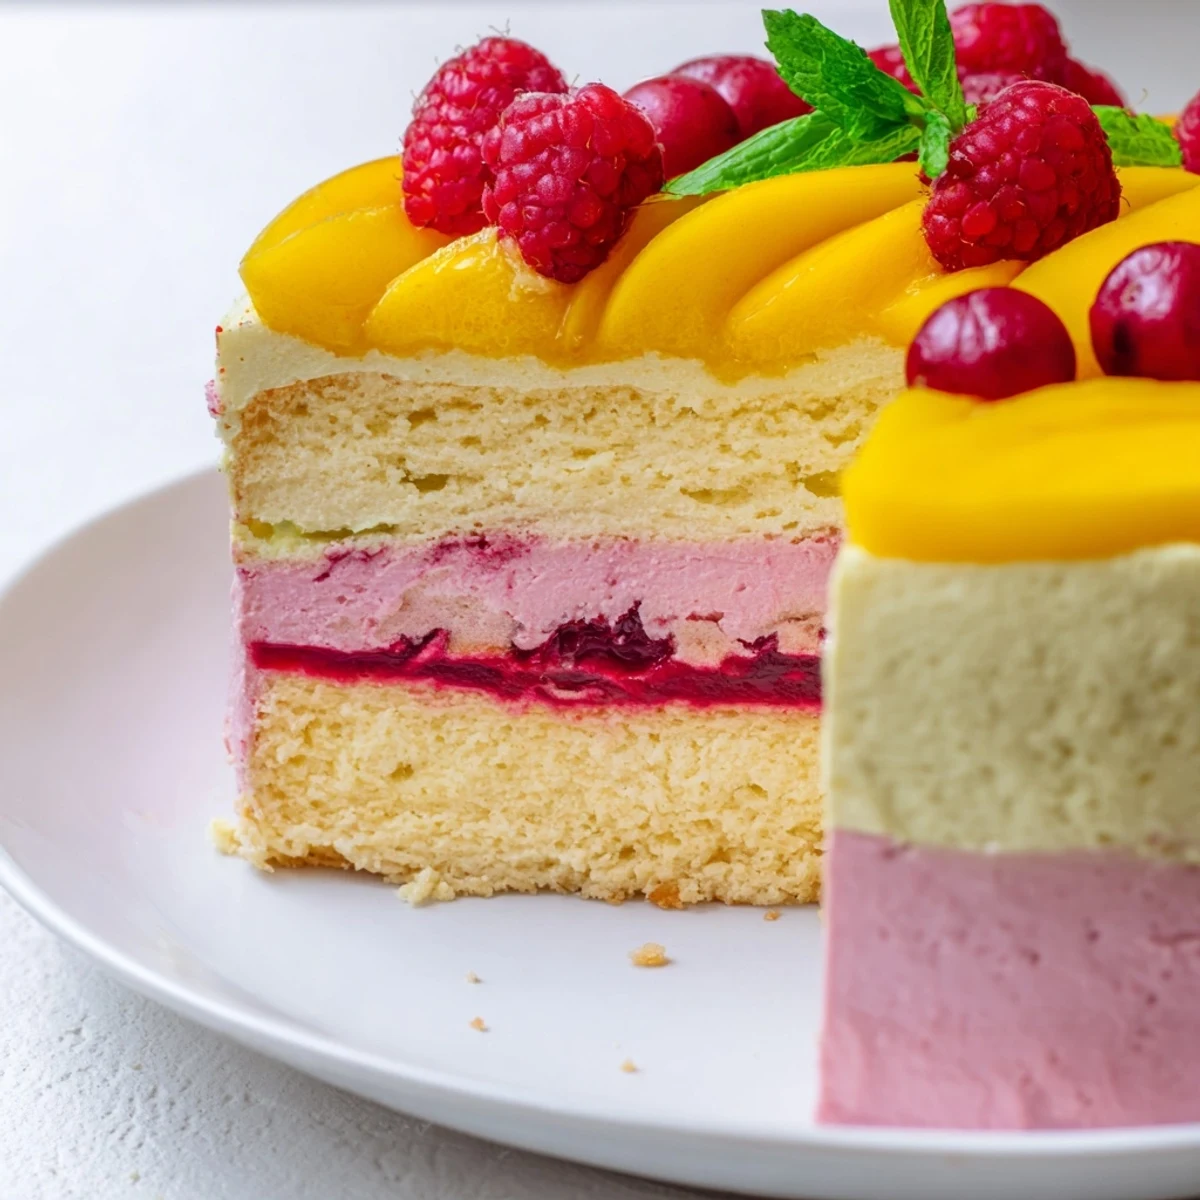
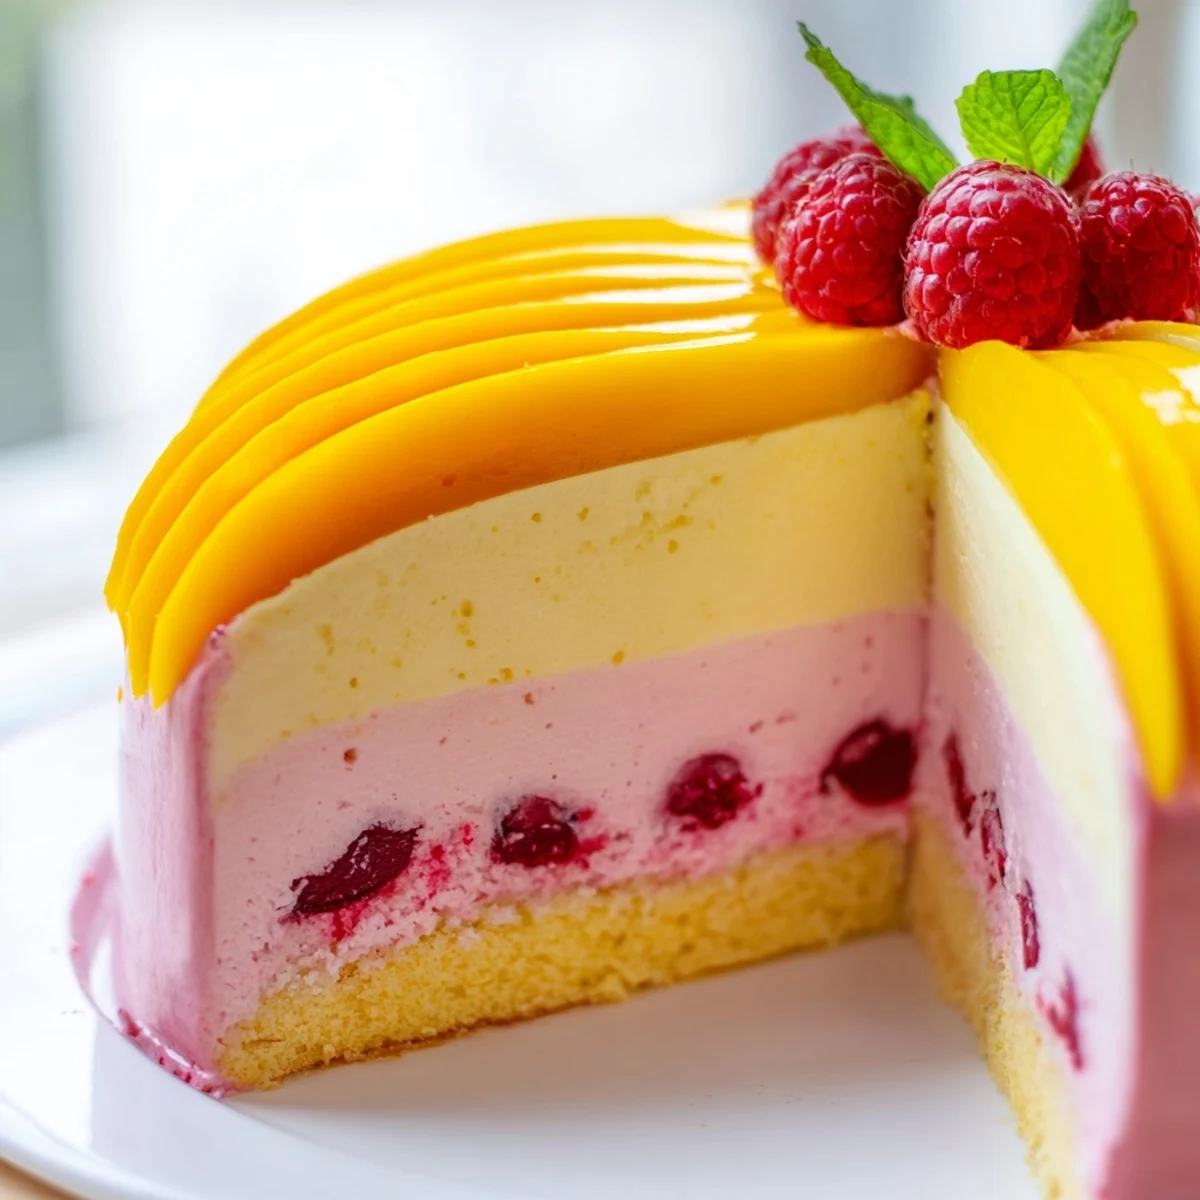
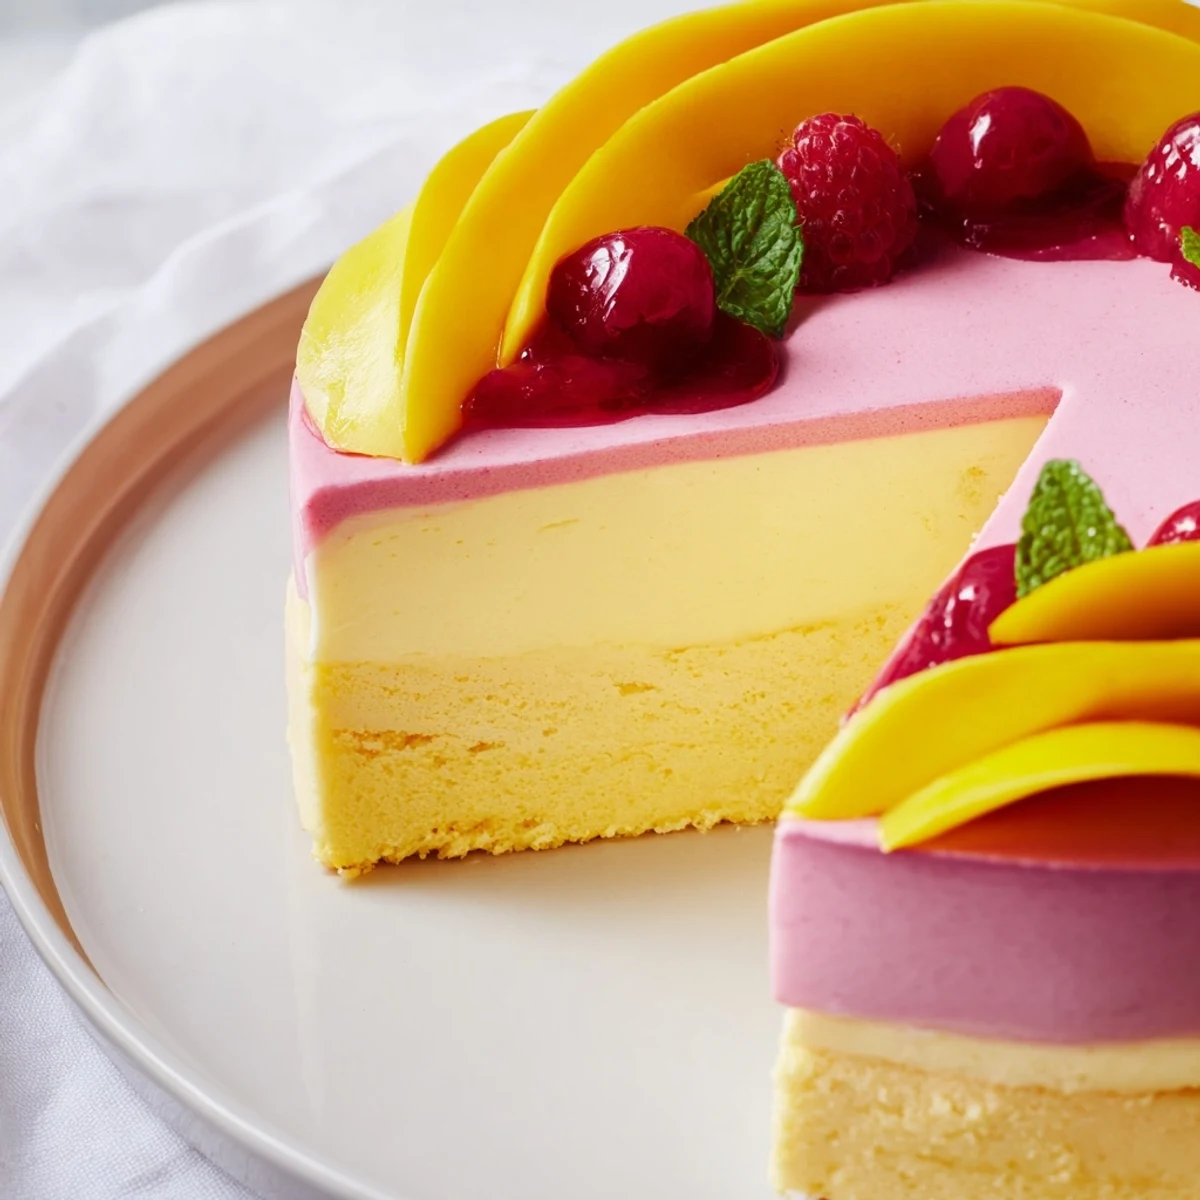
 Create an impressive layered dessert that combines tropical mango sweetness with tart raspberry brightness. This airy mousse cake features a delicate vanilla sponge base, followed by silky mango mousse and vibrant raspberry layers, each lightened with whipped cream and set with gelatin. The result is an elegant dessert that's refreshing yet indulgent, perfect for warm weather entertaining.
The total process requires planning ahead with 4 hours of chilling time, but the active preparation is straightforward. You'll bake a simple sponge, prepare two fruit mousses, and layer them before letting everything set. The final crown of fresh mango slices, raspberries, and optional mint creates a stunning presentation that belies the simple technique.
This versatile dessert can be adapted for gluten-free diets and pairs beautifully with Moscato d'Asti or fruity sparkling wine for a complete dessert experience.
The humidity of that July afternoon had me searching for something that felt like sunshine on a plate. I had overripe mangoes sitting on my counter and a pint of raspberries that needed attention, so I decided to layer them into something ethereal. My kitchen filled with the tropical sweetness of mango puree while I whipped cream, and I knew this was going to be special.
I served this at my mothers birthday dinner last summer, and everyone went quiet when they took their first bites. My dad usually skips dessert but went back for seconds, admitting he couldnt resist the combination of textures and flavors. Now whenever someone asks what to bring to a summer gathering, I recommend this mousse cake without hesitation.
Ingredients
- 3 large eggs: Room temperature eggs whip up fluffier and give your sponge base better structure
- 90 g granulated sugar: Divide this between your sponge and both mousses for balanced sweetness throughout
- 90 g all-purpose flour: Sift this first to prevent any lumps in your delicate sponge layer
- 1 tsp vanilla extract: Pure vanilla makes a difference here since it appears in both base and filling
- Pinch of salt: This tiny amount helps lift the vanilla and brighten all the fruit flavors
- 300 g ripe mango flesh: Choose mangoes that yield slightly to pressure and smell fragrant at the stem
- 2 tbsp fresh lime juice: The acid cuts through the rich cream and makes mango flavor pop
- 250 ml heavy whipping cream: Keep this ice cold until you whip it for the most stable mousse texture
- 6 g powdered gelatin: This is what gives your mango mousse its silky but firm structure
- 3 tbsp cold water: Use ice water to bloom your gelatin properly before incorporating
- 200 g fresh or frozen raspberries: Frozen ones work beautifully here since you will puree them anyway
- 1 tbsp fresh lemon juice: Brightens the raspberry and complements its natural tartness
- 200 ml heavy whipping cream: Same chilling rules apply for the raspberry layer
- 5 g powdered gelatin: Slightly less than the mango layer since raspberry puree is thicker
- 2 tbsp cold water: For blooming the raspberry gelatin
- Fresh mango slices and raspberries: These are not just pretty but signal whats inside to your guests
- Mint leaves: Optional but they add a lovely fresh contrast against the sweet cream
Instructions
- Prepare your sponge foundation:
- Preheat your oven to 180°C and line a 23 cm springform pan with parchment paper. Beat eggs and sugar until pale and fluffy, then fold in vanilla, salt, and flour. Bake for 12 to 15 minutes until golden and springy to the touch, then cool completely in the pan.
- Make the mango mousse layer:
- Bloom gelatin in cold water for 5 minutes while you puree mango with sugar and lime. Warm the puree gently, stir in dissolved gelatin, then cool to room temperature. Whip cream to medium peaks and fold into the mango mixture before spreading over your sponge base. Chill for 30 minutes.
- Create the raspberry mousse topping:
- Soft gelatin in cold water as you puree raspberries with sugar and lemon, then strain out the seeds. Heat the puree, dissolve the gelatin, and let cool. Whip cream and fold into the raspberry puree, then gently spread over your set mango layer. Refrigerate for at least 3 hours.
- Add the finishing touches:
- Release the cake from its springform pan carefully and arrange fresh mango slices and raspberries on top. Tuck in mint leaves if you like, then serve immediately while the flavors are at their brightest.
 Save to feedthepins
 This recipe has become my go-to for summer dinner parties because it can be made entirely ahead of time. I love pulling it out of the fridge right before dessert and watching peoples faces light up when they see the layers.
Making It Gluten Free
Swap the all-purpose flour for a 1 to 1 gluten-free baking blend and your sponge base will still be tender and light. The mousse layers are naturally gluten-free, so only the base needs this simple adjustment.
Working with Gelatin
I learned the hard way that gelatin needs time to bloom properly in cold water, so do not rush this step. Sprinkle it gently over the water and let it sit undisturbed until it becomes spongy before dissolving.
Serving and Storage Tips
This cake keeps beautifully in the refrigerator for up to 3 days if covered carefully. For the most stunning presentation, cut it with a sharp knife dipped in hot water and wiped clean between slices.
- Chill your springform pan in the freezer for 10 minutes before adding the sponge to help it stay flat
- Use an offset spatula warmed under hot water to smooth each mousse layer perfectly
- Let the finished cake sit at room temperature for 10 minutes before serving for the creamiest texture
 Save to feedthepins
 There is something deeply satisfying about cutting into this cake and seeing those distinct layers of sunshine and berry. It always feels like serving a little piece of summer on a plate.
Recipe Q&A
- → How long does this mousse cake need to chill before serving?
-
The mousse cake requires at least 3 hours of chilling time after the final layer is added, plus an additional 30 minutes after the mango layer. For best results, plan for 4 hours total chilling time, though overnight chilling works perfectly too.
- → Can I make this dessert ahead of time?
-
Absolutely! This mousse cake is perfect for making ahead. You can prepare it up to 24 hours before serving. In fact, the flavors develop and the texture improves after several hours of chilling. Just add the fresh fruit decoration shortly before serving for the best presentation.
- → What's the best way to remove the cake from the springform pan?
-
Run a thin knife or offset spatula around the edges to ensure no sticking, then carefully release the springform ring. Work slowly and gently to avoid disturbing the mousse layers. If you're concerned about sticking, line the pan with plastic wrap before assembling.
- → Can I use frozen fruit for the mousse layers?
-
Yes, frozen raspberries work beautifully in the raspberry mousse layer—just thaw and drain excess liquid before pureeing. For the mango layer, frozen mango chunks can be used if fresh isn't available, though high-quality fresh mango will give the best flavor and color.
- → How do I know when the gelatin is properly dissolved?
-
Heat the fruit puree gently until warm but not boiling, then add the softened gelatin. Stir continuously for 1-2 minutes until the gelatin completely disappears into the mixture. You should see no granules or cloudy bits. If in doubt, rub a small amount between your fingers to check for smoothness.
- → Can I substitute the gelatin for a vegetarian version?
-
Yes, you can use agar-agar powder as a vegetarian gelatin substitute. Use approximately 2 teaspoons of agar-agar for every teaspoon of gelatin, but note that agar sets more firmly and may give a slightly different texture to the mousse.
- → What's the best way to store leftovers?
-
Store any leftover portions in an airtight container in the refrigerator for up to 3 days. The texture will remain excellent, though the fresh fruit decoration may soften slightly. Avoid freezing, as the mousse texture will become grainy and watery when thawed.
